Friday, December 16, 2011

Deck the Hull... Fa-la-la-la-laa

Here in no particular order are some signs of progress...

I have admitted previously to having second thoughts on my deck design on account of its myriad of unanticipated challenges.

...of course, the unanticipated nature was simply a matter of my inexperience and foolish notion of having to make something special. Even some rather "ordinary" design would, in fact, have looked quite splendid on this fabulous kayak.

For better or for worse, I will complete what I started and will chalk the outcome up to gaining a boat-load of experience working with cedar strips. Whatever it's eventual appearance, it will paddle like a Night Heron and that's job one.

Anyway, in the process I have gotten reasonably good at getting a tight fit on the easy pieces which do not require extraordinary clamping maneuvers or major bending and twisting.

With a simpler design I would have had finished the deck a long time ago.

But here I am, still plowing away - decking the hull - as it were.

Okay then, I am trying to take a quasi Zen approach - "being in the moment" and "enjoying the journey" - with splinters, dust and sticky fingers - it seems to be the fa-la-la way.

A building meditation in cedar!

In fact, during moments of pause I have given some thought to what I might build after the Night Heron has been completed.

In case it has not yet become totally self-evident: a nascent shipwright I be!

I should pick a fully strip-planked boat, for example the microbootlegger which is another one of Nick Schade's designs.

There are many other tempting sleek sea-kayaks such as the Petrel - 100% strip planked. But I'd rather build something in which my wife would feel comfortable. This last season we had some promising outings on rented kayaks.

If I select a straight-forward design, the lines of the boat itself will be high-lighted. On the microbootlegger this would work very well. 

In the course of my deck building efforts so far, I have arrived at one definitive conclusion: the ideal builder of boats would either be an Octopus or else one of those Hindi Deities with a myriad of arms encircling the gilded torso.

Alas, (happily) I am neither!

Friday, December 2, 2011

The Will to Bend

Preparing the strip to do the unthinkable - bend!
The earnestness of cedar planking begins into the will to bend - or not to bend - as the case may be.

Honestly, if I knew then what I know now, I would have settled on a much simpler design - at least for a first attempt at cedar stripping the challenging deck of  this model.

Don't get me wrong, I still like the design a lot BUT - the 3-D reality of the Night Heron deck is d-d-daunting.

Since my design requires a number of shorter, bendy, warpy and twisted strips, I am finding myself resorting to

Preparing to bend
sneaky tricks...

Blowing Steam


blowing steam...
and brute clamping force...

...each of which can be quite persuasive when deployed judiciously.

One word of praise for the invention of the Quick-Grip clamps which can be tightened with one hand alone while holding the strip to be clamped in place with the other.

I would not want to do this job without these neat tools - unless, of course, I had a second pair of hands to assist.

This thin curved strip needed hot steam - a lot.
I broke five strips on one particularly challenging section before I got one piece that agreed to submit to the required twist and curvature.

I admit to contemplating a fresh start.

It was a bit discouraging. Alas, in the end persistence, keeping cool and a touch of ingenuity overcame inflexibility.

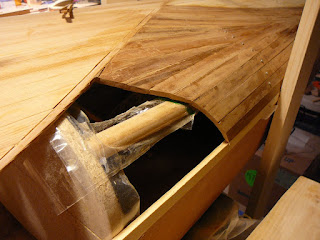
Clamping a short whiskey plank

I basically made up two types of clamps which were necessitated by the  fact that none of the standard clamps could be applied to exert pressure on the part in question.

One quasi "clamp" is a fairly small triangular piece of softish cedar (left over from my Greenland paddle) which I essentially tied around the hull and deck using a small purchase system allowing to apply substantial pressure.


The other clamp of sorts consists of two 4' long 1x4's standing on either side of the kayak. They  are held in position on the floor with a simple adjustable rope. They reach well above the kayak deck line where they are tied with another type of purchase to allow strong pressure on the sheer of the boat. I found this type of clamp necessary since many of the bend cedar strips tend to continue to press outward on the sheer.

Unfortunately, the manual as well as Nick Schade's two otherwise very helpful books do not delve much into the dirty detail of working with unusual designs and shorter strips or extreme curves.

In addition to the forms around which you construct the strips, I hot-glued some stringers at strategic locations in order to ensure that the deck curves were maintained where there were no forms to hold on to.

Capping off the dark wood with a thin strip has been a challenging task.
 Necessity is the mother of invention. And so it goes and I plug along.

I guess this is what builds experience - eventually.

One thing has become quite obvious to me - I don't have it yet. But in the meantime, I am learning every day new aspects of how wood does not like to behave.

Okay, I do not have the fancy power tools either. I could definitely use a table saw... but then, I really don't mind learning how to saw a thin strip length-wise into two halves. I've actually gotten quite good at that.

I am making progress but still concerned about the ultimate outcome.

If it is not going to look wonderful in the end, why bother, right?!

Time will tell.

Saturday, November 19, 2011

Ready to Strip?

The terminology strip planking ("stripping" for short) strikes me as a bit odd. Gosh, one's imagination might run amok about the possible meaning! Generally, stripping implies the removal of something... paint... clothes... packaging...whatever. So here we have strips of wood - duhhhh (!) longish pieces of wood that have been stripped away from the henceforth bare-naked tree - well, okay - it'll be stripped down to nothingness.

Strip planking refers to a boat construction technique whereby strips of wood - thin planks - are laid side by side to construct a surface shell of the boat. It could be the "skin" of the entire boat - hull and deck - or in the case of the hybrid kayak, the deck only.

Forms in place - ready to strip plank
So, once the stitched hull was glassed inside and out, the forms had to be installed at one foot intervals. These become the temporary inner skeleton around which we will lay the ceder plank deck.The forms are covered with plastic tape so that you don't accidentally glue the cedar planks to the forms. The planks must be bent, coaxed, finagled and convinced by force and cunning to take on the sweeping contour of the kayak deck.

As suggested by my Night Heron guru at CLC Boatworks, Joey, I obtained a cheap clothes steamer from Sears in order to inject warm moisture into the cedar planks thereby providing them with greater pliability - albeit temporary. Another weapon of choice is a heat gun as well as many clamps, some judiciously placed weights, an ample supply of patiences and (oy!) - an amiable arsenal of expletives - the latter was not mentioned in the instructions.

The strips are secured along the forms in one of several ways. The simplest and quickest method is to use a staple gun. The designer in fact expressly recommends its use. A somewhat less efficient but perhaps cleaner method is to use brad nails. The indirect securing of the strips by means of clamping and wedging the strips to the forms will result in the cleanest look, however this is the most tedious method.

Had I opted for a design with many long strips, I might have opted for the cleanest option. However, my design will require many strips and I am therefore going to utilize brad nails when the strip needs to be secured to the forms. The stapler comes in handy when I want to wedge a strip and I can quickly staple the wedge next to the strip.

Obviously, the trickiest areas are those where the sweeping shape of the deck or the curvaceous design require the greatest deviation from the natural (straight) state of the plank.


You start with the sheer plank, the one that runs directly along the hull and meet at bow to stern. Several strips had to be scarfed together and then shaved a bit more narrow in order to get a sufficiently flexible, continuous sheer strip. According to my design I also needed to insert a thin dark strip at the bow and stern.


The next step typically is the king plank which generally runs along the center line of the deck. In my design there is no continuous king plank, however, the three component plank runs toward the cockpit a good bit of the way from bow and stern.  So, that was my next step.

Since my plan requires many shorter strips, curved pieces (all the while adhering to the larger shapes) I have to plan carefully and give a lot of thought to the sequence in which I should add planks.


I used very thin masking tape to lay over the forms the outline of the shapes. I'll have to remember to remove them or cover them with plastic before the glue has a chance to bond to the tape.

Friday, November 11, 2011

Symmetrical Asymmetry

The shape of a sea kayak invites a symmetrical  deck design - it is the obvious choice. After all, the long hull is designed with longitudinal symmetry... and I have seen some absolutely gorgeous mirror-like deck plans.

The doodle which now is awaiting realization

Also, I would expect a symmetrical design easier to build - unless it were an intricate mosaic - but perhaps a bit less imaginative. Anyway, as I was doodling on my sketch pad trying out various ideas, my mind continued to gravitate to asymmetrical deck lay-outs.

Finally, I came up with a sketch which I liked - that is "on paper". Within an asymmetrical shape there is a quasi front-to-back inverse symmetry. "Quasi" because the cross-section of the front deck is very rounded whereas the back becomes quite flat.

The lightest cedar strips will be used for the background upon which the cocoa and light brown strips form two irregular bands which intersect in front of and behind - thereby wrapping around the cockpit. The bow as well as the stern will have a very thin dark strip along the center line. 

Great Blue Heron
The general idea: an abstraction of a heron's beak.

Night Heron
To follow up on the previously posed question why I thought that the Night Heron sea kayak might more fittingly be called Blue Heron, I am happy to introduce as evidence a picture of each... and as they say, a picture is worth a thousand words.


Without a doubt, two exceedingly beautiful and elegant birds!


 ...and I am certain that the boat's designer, Nick Schade, had a definite reason to name this design "Night Heron".

...perhaps the elongated feather from the nape of the Night Heron's neck provided the inspiration.


I don't want to bore you with the concept of broken symmetries but to my eyes this design would satisfy the aesthetic appeal of this idea. I say "would" with caution and some trepidation because I am really not sure yet as to whether or not I have the necessary skills (and tools) to do the job. This deck design adds a significant element of challenge.

I hope I won't mess up too many pieces but I'll take my chances.  I can already anticipate that problems of bending the wood. It will not only have to bend as seen in 2-D but there will also be significant curves in 3-D.

I will report on my efforts to persuade the strips to bend.

Thursday, November 3, 2011

Form and Function

The Pungo is overseeing the construction process with some envy.
As part of the construction project, I've found it necessary to improve my work space. So, I constructed a simple work bench as well as a small work platform next to the hull.

The work bench along with some plastic sheeting form a fairly effective separation between the one remaining parking space in the garage and my work area.

With the hybrid method, the hull panels are constructed within external forms which help to maintain the shape before the hull form is epoxied into a stable shape.
The deck on the other hand is constructed by laying the cedar strips around a series of internal forms which define the deck shape.

These forms are temporarily hot-glued into the semi-completed the hull.

Here you can see how the cockpit apron will be fitting on the forms... but we are not ready for that. I just laid it in position to assist in visualizing the deck design.

Once all of that is accomplished we still have to secure some scrap pieces of wood into the inside of of the bow and stern along the sheer.

Ah, my first carving job!
...with many more to come.

Finally, we'll mark onto the forms the center line of the deck. I then laid over the marks a thin line of masking tape which will facilitate the process of transferring the intended design from 2-D onto a very curved 3-D surface.

Now we are ready to strip. Well, hold your horses! Before you begin to strip, you need to have a plan. Unless you are some improvizing boat building genius, you won't want to play this by ear.

CLC offers three shades of cedar strips.

You can tell CLC by percentages how much of each you would like. Of course this will depend on the specific design that you have worked out... plus a bit of guess work.

Even if you calculated it out the last square centimeter, you would be hard pressed to predict how many strips you might break while trying to bend them into shape or simply mess up carving them incorrectly.

I requested one third of each shade.

Next up: The Design

Sunday, October 30, 2011

Stitch then Glue

So, the stitch and glue technique was "an old hat" having this previous winter complete the Passagemaker Dinghy in the same fashion.

The hull of the Hybrid Night Heron is stitch and glue, so I did not think of it as a test of my skills.

For sure, it helped to have done it before, however, working with 18 foot long panels did add somewhat of new challenge.

Luckily, CLC provided external forms that greatly facilitated the process of achieving alignment and symmetry.

Making sure everything is in order - from all angles!

Glassing the inside!

Preparing the outside hull!

Glassing the outside hull!

So yes, the kayak gets a layer of fiber glass both inside and outside - thereby fully encasing both - the hull as well as the deck.
After additional coats of epoxy... filling in the weave.

In essence, this procedure (prescribed by CLC) makes these kayaks fiber glass boats with a wooden core.

Upon closer inspection - Yep! We seem to be good to go...

Now we'll have to sand inside and out to a completely mat appearance and then we'll be ready to set up the forms.


This is where things will begin to get exciting for me because the process will be new construction territory.

Before too long I'll have to talk about the Night Heron and the Blue Heron - yes, these are actual bird species...

While this design is called Night Heron, building it feels more like making a Blue Heron. Your assignment for next time: Find out why!

All of the boats designed by Nick Schade are named after birds in, on, above or by the water. I'll have to ask him at the next OkumeFest why he decided on Night Heron for this design...


Wednesday, October 12, 2011

First Things First

My main debate over whether or not to build the Night Heron was related to space.

WHERE, oh where could I build this boat? 18 feet is a long stretch of space and you need sufficient room to walk around the ends of the boat so, 22 feet clear would be about the absolute minimum. Well, the sun room which served as my shop last winter was definitely not going to fit that bill.

Okay then, the only other space that did not require knocking down walls in my house was the garage.

Alright, now that we have that solved, this being a "winter project" whose car would be parked outside covered by ice and snow? Iris said: That's easy: YOURS! Oye! ...but I cannot deny her impeccable logic. Plus: my wife is always right!

Snow has not yet arrived in these parts but rain has been pouring in abundance. And this explains my being somewhat premature with my "winter project".

The manual recommends building a sturdy 4' x 16' working platform. Had to give that some thought before coming up with a way of joining two 4x8 boards in a manner that there would be no sagging so that I could work on a perfectly level surface.

Once this was accomplished the project was ready to go.

Sunday, October 2, 2011

The Hybrid Night Heron It Is

I resolved to build a kayak as my second boat whilst waiting last December for my very first boat kit, the Passagemaker Dinghy, the building of which was chronicled on the In a Nutshell blog. Yep, that's right, I actually planned my second boat before building my first one.

Heck, it's all I could think of as I waited impatiently for the arrival of my first boat kit - for nearly a month. Let's just say that I was rather intoxicated by the keen excitement that I would be building several boats - if not more. And gosh, the catalog of the Chesapeake Light Craft (CLC) company offered so many tempting options.  It was just a questions of which boat to build.

I was pretty sure that it would be a kayak simply because I had taken to paddling for several years already - on a 12-foot Pungo, a nice recreational kayak made by Wilderness Systems. I had bought the boat as a tender to my SJ21 but mostly I used it to explore the nooks and crannies of lakes and rivers in the region and it also proved to be a stable platform for birding around the water.

Bow-Detail of Dan Thaler's Hybrid Shearwater 16
My initial research on what type of kayak to build lead me to decide on the 17-foot Shearwater Hybrid as the most likely candidate. The hybrid option means that the bottom of the hull is constructed in the basic stitch and glue method whereas the deck (top) of the boat is strip-plank construction. CLC offers three shades of Cedar which allows for some creative designs.

This past spring I headed to the OkoumeFest which the Chesapeake Light Craft company hosts annually. Boat builders bring their most recent creations to the Chesapeake, talk shop, attend informative demonstrations, rub shoulders with star builders and designers and - last but not least - get to try out any of the boats offered by CLC. Speaking with Nick Schade about his perspective of his various designs was particularly valuable. With the latter foremost in mind, I climbed in to a number of Shearwater 17's and was thrilled with the superb performance of this design.

Paddling the Petrel - a fast water version of the Night Heron
Even so, there were other boats to try. And so I did - all along quite certain that I'd be building the Shearwater 17.  But then I took off in the somewhat more formidable Night Heron. I was initially intimidated by the sheer length (18') of this very slender hull (20"). But with a few strokes of  my paddles I realized that I sat in a totally amazing craft... smokin' - Wow! What can I say: Paddling passion was ignited!

Fast and efficient, the hull tracks well, is prone to surf on the smallest waves and carves a fast turn. That'll suit me just fine, thank you! Performance on the water aside, this boat is a magnificent design. Of course, the ultimate appearance is up to each building in as much as the deck requires a very personal touch.

By the way, an example of the designers personal construction of the Night Heron is in the permanent collection at the Museum Of Modern Art (MOMA). But let there be not mistake about it, this boat wants to be in the water.

On a account of an OkoumeFest special deal for attendees, the kit was ordered shortly after my visit to the OkoumeFest and has been stored in my garage - patiently awaiting its being brought to life on the seas.

Prior to getting started in earnest, a number of preparations were required.