Thursday, April 26, 2012

Oh No! - Dagger in the Heart

Gosh, I am embarrassed to divulge that last weekend "Mr. Stupid came back to town" (Sorry, Richard Thompson!)

In the interest of not further damaging my standing amongst boat-builders, I might have opted to keep this affair altogether private - if it weren't for the fact that the weather has been cold (40s), windy (25+ knots) over the past weekends. Neither sailing nor paddling would be all that appealing under those conditions. Hence, some spare time was available. 

Some might say that "it was bound to happen". Well yes! In fact, Nick Schade maintains that a kayak only become a perfect boat after it has sustained its first major scratch... but I don't think that he had this kind of accident in mind. 

The first darn dent. Ouch - dagger-in-the-heart kind of mishap. Alright, calm down - so tell me what exactly happened? Well, I neither ran over a sharp rock nor banged into a concrete pier. Here goes:

So, after much thought on convenient and safe storage of the kayak, I had devised a fine minimalist method of storing the kayak in the garage while (at least in principle) allowing for my car to once again find room next to my wife's car.

I knew that eventually I would want to construct a rack that would accommodate my next kayak right underneath but in the meantime, here I had come up with a simple method, employing the two safety lines used to secure the ends of the boat on top of the car roof during transport. The little ratchet mechanism made it easy to gradually elevate the boat from two saw horses right along the wall of the garage.

So far so good. When I had first attached the metal hook to the safety line, I used a simple knot that has never failed on my spinnaker sheets.

Alas, I failed to recognize that this might not work so well when tying line to a smooth stainless steel hook which does not offer the same kind of friction. To make a long story short, while retrieving the boat for my next paddle, one of the trusted knots failed spontaneously and the back end of the hull dropped 2 feet and landed on the corner of the saw-horse before I could catch it.


Yikes! My heart leaped into my throat as I lowered the other side before I could turn the hull and examine the spot when the hull impacted on the saw-horse. 

Okay, it could have been a lot worse... such as if the knots had failed while I was not standing right there and the boat would have dropped all the way to the ground... at any rate, it was not a pretty sight and clearly, the fiber glass had cracked underneath the biggest dent. 

I sanded the area lightly in order to better see where and how the impact had occurred.

Yep! Clearly something had to be done! I certainly did not want to risk letting water penetrate the wood. I emailed Dr. Joey some pictures and after a consult, I had the action plan I needed.
  • Isolate and mask off the trouble spot
  • Sand through the fiber glass all the way down to bare wood.
  • Apply steam to the dents to allow the wood to "un-dent" itself.
  • Fill any remaining cracks with light thickened epoxy as needed
  • Sand
  • Fiberglass over the area
  • Blend into the fiber glass around
  • Fill weave with epoxy
  • Sand
  • Many layers of varnish
  • Sand and polish
"But Joey", I asked: "That process will take weeks, right!?" "Not really", he answered.

As it turns out, the secret to greatly expediting these steps is to use the heat of a lamp positioned closely so that the process of curing epoxy and varnish takes a lot less time.

Down to bare wood
After talking to Joey, I began to feel more positive about the mishap.

It was an opportunity to learn something new, something important about strip plank repair.

Close to being finished


The total repair was accomplished over three evenings.

Now that this was taken care of, I obviously, attached the hooks with a different knot which could not possibly slip.

Obviously I should now have the confidence to store the boat in the same manner.

However, I decided to seize the moment and go ahead to build the rack now rather than later.

After weighing a variety of design options, I picked one that was relatively easy to accomplish with hand tools only.

2X4's dove-tailing at a slight upward angle into 2X8 uprights.

As you can see, I am now able to also store my little yellow kayak - albeit temporarily - until I have built my next kayak.

I am glad that the repair went so quickly because I am going to the CLC sponsored OkoumeFest which is coming up next weekend..

Perhaps we'll see you there ~~~

Thursday, April 19, 2012

Call of the Loon

Since my last post I have now had the chance to paddle the Night Heron already a number of times - in a variety of conditions ranging from flat water in drizzled skies to raging white caps in sunny breezes.


I was not surprised by the spectacular ride it offers regardless of conditions.

Testing the Petrel, the 17' cousin of the Night Heron
After all, it was that test-paddle on a Night Heron at last year's Chesapeake Light Craft sponsored "OkoumeFest" which swept me off my feet and caused me to order the kit.


 In flat water the boat slices through the water like a hot knife through soft butter. It almost feels as though there is no resistance at all and the boat can't wait to get going.


Hard to see the white caps at a distance
On one windy occasion, the experience varied greatly depending on whether you were going upwind or downwind.

The winds clocked regularly at 20 knots with gusts around 25+ knots - white caps everywhere. Going upwind, the bow would frequently submerge for moments with larger waves freely washing up over the deck to the cockpit. Of course, the neoprene spray skirt kept me well-protected.

At 18 feet the hull remained stable and bounced very little so long as you kept the nose straight into the wind. Making progress was hard work. I worked myself about three miles upwind in those conditions and I was getting pooped.

Downwind on the other hand was a slay-ride. The hull constantly surfed and gain tremendous speed with little effort other than keeping her straight downwind. Surfing on broad reaches was definitely more of a challenge since you had to work a bit in order to counteract the hulls tendency to align parallel to the waves... without question the least stable and most bouncy paddle point.

A little zooming tells the tale
On the 25 knot day I made sure to paddle upwind first and then reward myself with an exciting downwind leg afterwards rather than risking a miscalculation of my endurance and being totally spent with yet more upwind miles to go to home port. Without questions, the scariest part of that outing was not the paddling but the transporting of this 18 foot boat on top of my car.

Note to self: For now, let's keep it to 15 knots or less! It'll still be plenty exciting - especially in larger bodies of water.

So far the kayak has only seen the waters of Moraine State Park (Lake Arthur). On my paddle agenda:  explore parts of the Allegheny River, launch on the Youghiogheny River (obviously not near the White Water sections) and check out the Chesapeake Bay. I'll be working on my paddling skills - judging by some of the training videos, I still have a lot to learn.

From the Night Heron, many water birds permit a very close approach. Recently I found myself encircled by 30 or 40 Bonaparte Gulls. Amazing!

My favorite birding moment with my Night Heron came on the foggy drizzle day. All of a sudden, I found myself face to face with a loon.  Loons pass through Moraine State Park only during spring and fall migration to and from Canada. I had heard them at a distance a number of times during these past weeks.

But this was a close encounter! - This magnificent specimen did not immediately dive away as one might expect but - instead it gave out its haunting call - right next to me - mystical and mesmerizing - as if to summon my mindfulness of this moment.

And I heeded its call.

Tuesday, April 3, 2012

Night Heron wetting its whistle


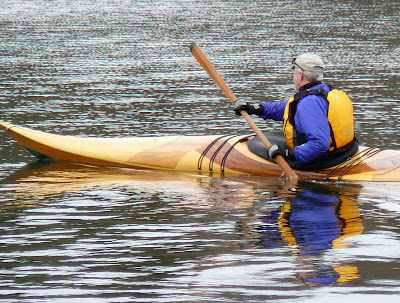
I'll spare you verbose exclamations of the Night Heron...

Snug fit is peace of mind
Stopping at the Park Office for my launch permit


It is a Greenland Paddle


Just the right amount of sea-green...


Slicing Aqua


Mission accomplished

Heading home for dinner

Monday, April 2, 2012

A Balancing Act

This new fledgling Night Heron is ready to take flight.

But not so fast!

Before we reached this point, a number of finishing touches took place.

Would not fit in one piece
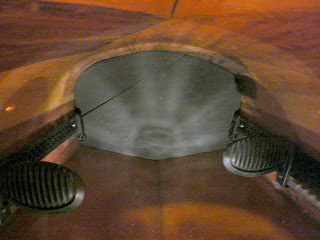
First as promised the dirty detail about the front bulk head which absolutely would not allow itself to be placed in its proper position.

The foot brackets were in the way and the thick mini cell bulk head simply had not sufficient flexibility to be squeezed in. 

My solution was to put it in place in two sections.

Yep, had to cut her up.

Prior to sealing it into permanent position


It worked out alright.


I now was able to put in the larger section from the cockpit forward and the smaller section fit through the front hatch and could be finagled into position with all sorts of little tricks such as using a ruler in between the foam to allow it to slide in place.


By far the most unpleasant task in this final stage is sealing the bulk heads into position with 3M 5200 Permanent Sealant Adhesive. Joey warned me that it was "hateful stuff". And I found out why he had come to that conclusion.

Working with the semi permanent 3M 4200 Sealant is a breeze by comparison. I heeded Joey's council and had a rag and plenty of  mineral spirits on-hand to clean up messes. I also had lots of extra rubber gloves handy. Not surprisingly, the seal around the forward bulkhead from the cockpit was the trickiest because it had to be managed without the support of a second hand. Only one arm would reach in far enough.

Then came the gasket on the inside lip of the hatches and the inside bungees to pull the hatches tight on the gaskets thereby providing a water-proof seal. The job was straight forward and simple. I suspect that it'll take a couple of days until the gaskets are sufficiently compressed to provide a totally flush appearance of lids and deck. 

Then came some decision time.

How to set up the front and back bungees!

The more typical setup for the front bungees is to criss-cross in an X pattern in front of and behind the cockpit. I definitely did not like this look for the front section. It interfered too much with the underlying design.

For now I resolved the matter with parallel bungees running side to side. It is actually a very practical setup and has the advantage that anytime you use one bungee to clamp down an object the adjacent bungee protects the varnish from unnecessary scratches. 


In the back I used the more traditional look.

I added one additional bungee strap half way back.

This will enable me to conveniently strap my Greenland paddle along the back.

I am not sure about that one yet. It certainly is practical but obviously it does not enhance the design. It would be easy to remove.

Another finishing touch concerned the grab handles. Many builders carve beautiful wooden grab handles and I started to fashion one from a nice piece of mahogany.

However, upon further thought I abandoned the project and opted to go for the simple soft, knotted grab handle the way the folks at CLC generally do. Also, I figured that a soft grab handle would be less likely to bang against the bow.

Installation of the back brace in the cockpit was confusing to me until I actually sat down to do the job. I worked with the kayak upside down and head in cockpit to see what I was doing... it was easy.

Two days before I had carved and coated with epoxy the short wooden blocks into which the back brace webbing is screwed.

For the actual seat I had purchased one from CLC rather than making one from mini cell. Installation was easy and the first test fitting was entirely to my liking.

I still have to make the hip braces and knee braces... also from mini cell foam... but for all intents and purposes, the kayak is ready to go! AND - I am ready to go!

Anyway, these last two items won't be finalized until I've been in the water with the Night Heron and gotten a better feel for what may feel most comfortable.

My Night Heron is ready to flap its wings and take off...

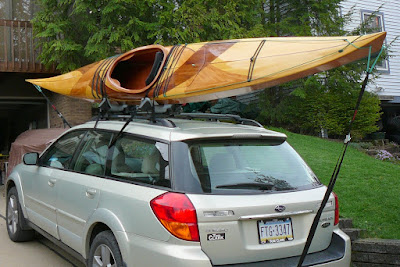
...just so the launching point is not the roof of my car. I've been testing the roof rack and figuring out how to maneuver this 18 foot dagger safely on and off the roof of my car - single-handed.

Ha - there you go!
It's a balancing act!!!

...and isn't that true for so much of what we do?